Showing posts with label nesties. Show all posts

Monday, September 20, 2010

Organization: Part Two

Question: What is the one thing that every stamper should start as soon as she buys her first stamp?


Answer: A stamp index!

Here is mine.  I started it last summer, after I had been stamping for about a year.  It took me a solid week of summer, but  I absolutely love it and can't imagine not having it (or starting it now!)  I have four binders: Stamps by Categories, Stamps by Company, Seasonal Stamps, and Embossing/Die Cuts.  My DH was nice enough to buy me pretty pink & brown binders at Office Depot for my project, too.  I use cheap cardstock for it, but heavy-duty page protectors (they were on clearance at the time so I stocked up).  Here are the categories I use: flowers, trees/leaves, butterflies/insects, birds, dogs, domesticated animals, wild animals/dinosaurs [there was no real need to break up domesicated and wild, but it makes me happy], people, things [I wish I would have made a separate food category], things that go, places/scenes, love, birthday, other events (baby/wedding/graduation), doodads, flourishes (two completely different things!), and backgrounds.  For the sentiments, I have an "all" category, then broken down into: love, birthday, thank you, friendship/miss you, congrats/wedding/baby, feel better/sympathy, and quotes.  I also have categories for each holiday.


For each new set, I pull out all the relevant categories and stamp. I also stamp the entire set on the company page.  Then I mark off the section and label it with company name and set number.  Learn from me: don't try to "squeeze" in different sets.  White space is your friend. Especially true for the sentiments-I started going across the page, but it is about 1000 times easier if they are all in a column like this.

This is one of my punch pages.  I punched the shape on the edge, then added the punched shape next to it.  Very handy to see if a sentiment will fit on a tag.


Which brings me to my next resource: my nestie pages!  I hate to brag, but these are awesome. I have these for each nestability set.  They are even color coded so all the circle sets are pink, squares green, etc.  To run them through the cuttlebug, I cut the paper in half (hint: cutting the paper in half at 5 1/2 instead of 4 1/4 makes it shift less).  Both sets of rectangles can fit on one sheet, as can the ovals, but circles & squares need two sheets if you're going to use both small and large.  Then I labeled them as S1, L1, S2, etc and with their measurement.  I don't keep them in a binder so I can just pull one out when I'm looking through my stamp index to see if what size will work.


Hating to throw anything away, I kept the cut portions together in a cd sleeve.  These are great to pull out to see how different sizes will fit in a layout.
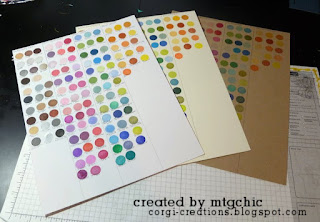
And this is what I finally got around to doing last weekend-a stamp ink index.  My sister sent me a solid circle stamp that was perfect for the job.  I stamped all my inkpads on white, cream, and kraft.  And, guess what?  I chucked any pad that didn't work! I know, sounds crazy! Am I the only one that keeps throwing back dried-up old pads into the drawer (SU pigment pads, I'm looking in your direction)?

What are your favorite organizational tips or tricks?  I hope you found a few new ones here, or at least were inspired to do a little organizing with your own system!

ps-for real, start an index now.  The task will only get longer the more you put it off!

Sunday, September 19, 2010

Organized: Part One

Time for the weekly post from Meg!  This week is all about my organization, and hold on to your hats, because there's so much stuff I'm going to post over two days.  Yes, that means at least TWO posts from me this week.  Today I'll share with you my stamping room.  Don't you love seeing where people stamp? I went to Michael's and HomeGoods yesterday and scored some great baskets, so I spent this morning purging and re-organizing.  Here are the results:

I stamp in one of the extra bedrooms in our house.  I also get ready in the mornings in here, have my computer set up in here, and this is also where Addie's crate is.  Definitely a hodge-podge, but it works for me.  Anyway, this wall is between the door and the closet.  The bookcase is from Target and I just bought all the red baskets at HomeGoods (in the baby section, not the basket section).  I'm going back to get one more to put all the cardstock in on the bottom shelf.  From the top down, I have a tin for my dies/embossing folders, a spice rack that I use for buttons, a basket for 8x8 paper, a basket for 6x6 paper, 8 1/2 x 11 paper, and magazines.  On the left is another basket that is the perfect fit for 12x12 paper pads and packs.

This is the wall over Addie's crate (we crate-trained her and I have never seen a dog love her crate as much as she does).  The shelves are from Lowe's.  On the top shelf, I have some scraponizer cases for Unity KOMs and other stamps, SU unmounted cases, embossing & sewing stuff, embossing powder in a ziploc container and PTI stamp sets.  On the bottom shelf, I have all my clear stamps.  I made the tote, the basket is from HomeGoods, and the metal suitcase was a gift from my mom.  I also have my SU markers there. 

This is an older picture, but my camera battery died before I could take all of them (plus it has better coloring).  I have SU and PTI paper on top of the storage cube, and in the storage cube (from Hobby Lobby), I have inks, acrylic blocks, embellishments, ribbon (in the fabric pullout drawer from Target-love!), and punches.  The table is also from Target. The red spinny thing was from HomeGoods and an awesome find.  It holds all my prismacolor pencils plus all my tools.


 I was inspired by Dawn's organizational post to redo my nesties.  This tin (also from Homegoods) was the perfect size (with room to grow!).  I use a napkin holder to hold my cuttlebug plates.

Here is what I did for the nesties.  I bought some of the magnetic vent covers at Home Depot-they were about $4.50 for a pack of three 8 x 15 inch sheets, which I cut in 4 x 3.75 inch pieces.  24 squares out of a package = 18 cents a square: a pretty cheap storage solution, I must say.  I adhered the squares onto the Spellbinders inserts (cut in half) and then just used some chipboard (a nice sheet comes in the package of vent covers, too) and cereal boxes for the rest.

They work for SU and PTI dies, too!


So that is all for today, because I'm going to have some lunch and actually STAMP in my stamp room!!!  I'm a bit behind on some birthday cards that need to go out this week.

Hope y'all are having a great time in your stamp space, or wherever your happy place is this weekend.
Meg